Our home has a full basement, running the length of our home. When we moved here in 2001, there was only a single wall running the length of the basement - effectively cutting the basement in half. About two years ago, my father-in-law helped take one-third of the back half and make a very large bedroom. However, the boys were too young then to move down there so it became a "tv-room." Now, the boys are old enough and the girls are also getting to old to share a room and MOM AND DAD WANT THEIR BATHROOM BACK! So, back on May 13, I set out to finish the front half of the basement for a new TV/Rec room so that the boys could move downstairs and one of the girls could move into the soon-to-be vacant boys' room. Below you will see our slow but steady progress on the new room.
Andy Rosenbalm, a good friend from church and fantasy football cohort, agreed to help me with the project. To prhase that more accurately, he agreed to let me help him with the project. Andy is living up to his nickname - Handy Andy. This engineer from Kewaunee knows what he's doing.
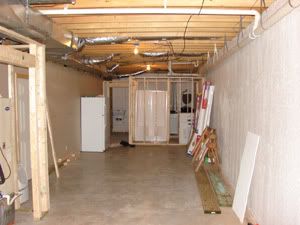 Andy and I started way back on May 13 by building some walls for the bathroom and closet to hide the HVAC unit. The bathroom walls went up in one Saturday morning with no problems except the need to purchase additional drill bits to drill through the hard concrete. You can also see the shower unit which was not easy to get into the basement and left both of us picking fiberglass shards out of our hands.
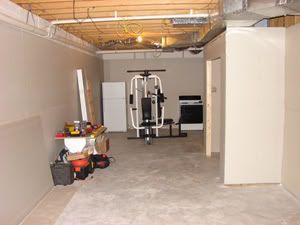 Now the drywall is up and ready for mud. Andy and I hung the drywall ourselves but left the mudding to the experts. That was $500 well spent! I don't know if you've ever lugged 16 sheets of twelve-foot drywall but it is extremely heavy and awkward and "bendy." In the upper right of the photo, you can see the main trouble-maker of the project - a pipe that goes to the septic tank. The ceiling in the basement is about nine feet high to allow for a drop ceiling. This pipe runs along the front wall, getting lower and lower all the time. At the point where it hits the bathroom wall, it is about 93 inches off the ground. So our eight-foot ceiling ended up being 92-inches high. Fortunately, I don't know any 7'8" people.
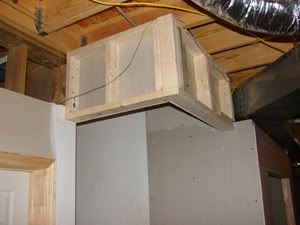 Besides the approximately twelve "good ideas" I have come up with (Yes, I kept count!), here is my main contribution to the project (except perhaps the shower step - more on that later). We had a hard time figuring out how run the stairwell ceiling into the suspended ceiling. Here's the solution. The suspended ceiling was to run along the bottom of those 2-by-4s. However, we did this about four weeks prior to installing the suspended ceiling and we ran into some problems there. You'll see our solution later. Try not to laugh and professional carpenters - walk away NOW!
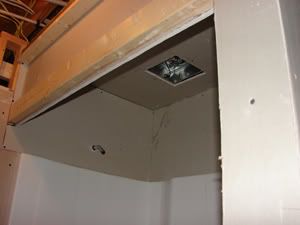 You are looking at the ceiling of the shower. This also caused a little problem. Because I didn't want to bust up the concrete, we decided to go with a pump-up system to take care of our waste from the shower, sink and toilet. We are using this ingenious little system - kinda like a blender on steroids attached to a powerful yet quiet pump. The picture tells the whole story except we were able to hide all our pipes in the walls so you'll never know you are using some weird type of toilet. Anyway, because we didn't bust up the concrete, we had to elevate the shower to allow for the placement of the p-trap. This raised the top of the shower to about just an inch above the top of the shower pipe sticking out of the wall. That just would not do so we built a little wood-n-drywall box above the shower stall to address the problem. This also allowed room to install a light/exhaust fan to take care of the moisture. All in all, a nicer solution than the original plan.
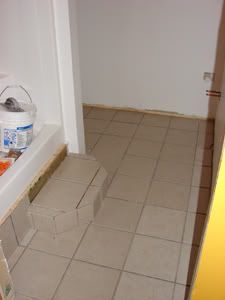 Here is the bathroom with the tile laid down and the shower step covered. The shower will mainly be used by my two boys (12 and 5 at their next birthday) and they basically had to crawl into the shower jacked up on 2x10s. This little step solved that problem and actually looks pretty good, even if I did build it unsupervised by Andy. Needs a little protection on the edges - any suggestions?
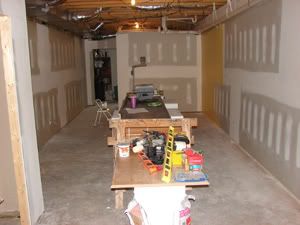 The family and I drove to Tampa/St. Pete on July 6 and spent a week down on the white sands of the gulf coast and also took in a Yankees/Devil Rays game. While we were gone. some very capable men took care of the difficult and dirty job of putting the mud on the dryall. They came about three days to spread the mud and then sand it down. There's NO WAY we could have done it in that time they did it and even less possibility it would have looked as good. Plus, we'd still be sweeping up the dust about five years from now!
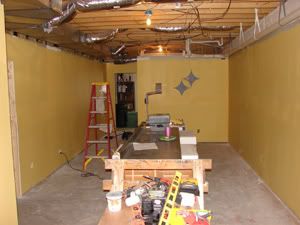 The primer is on the walls. Ambra and I put this coat on the day after we returned from Tampa. My wife has been a great help and incredibly patient. You will appreciate that even more once you see what I decided to do with this room. My wife loves me a lot. She must because I am decorating this room in a Steelers theme. I've been a fan of the Pittsburgh Steelers since the mid-70s when I was an impressionable 10-year-old. However, I am also a faithful fan and stuck with them through the horrible Bubby Brister-years of the 80s. As you can see on the wall, I had a plan to paint the Steelers logo on the wall, which would be just above my television. After tracing the logo using an overhead projector, I soon realized that I could not paint that thing and be happy with it. I am still exploring possibilities for getting it on the wall (professional painter, vinyl stickers, stencils to paint it with, etc). Any other good ideas are welcome - send them my way!
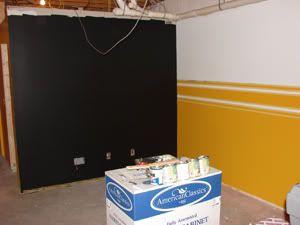 Here you can see that I decided to paint that "tv wall" solid black. Most of the home theaters I found online have done that. Supposedly, the darker background really makes the colors pop out and the darks even darker. I'll still put the logo up there. You can also see my idea for decorating the front wall. Part of the Steelers' uniform are the recognizable stipes on their sleeves. If I had thought about it more, I might not have done it. I had to tape the walls in a three step process. First, while painting the white upper half and gold lower half, I taped where the black stripes would be and simply painted the gold and white in the correct places. Then, I taped above and below the upper and lower stripes on each half and painted the four outer black stripes. Finally, I taped the middle stripes and painted the two remaining black stripes. My back and eyes will recover about the time I turn 45.
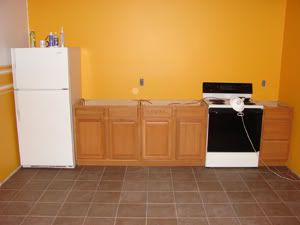 While Rick was over installing the shower and pump unit, he suggested putting in a kitchen. He said it would be easy. He didn't say it would be as expensive as it was but we're all glad we did it. This will be very nice on those Monday Night Football gatherings. We also decided to put in ceramic tile in the kitchen area and bath. Ambra and I went to Lowe's and picked out the tile on a Friday night. We even brought four individual tiles home to just see how it would look. Then I went back Saturday morning to buy the eleven boxes for the kitchen. As Andy and I began putting the tiles down, we quickly laid down one column and two rows in a 13x10 pattern. Andy then noticed that the light looked different on one of the tiles. I quickly realized what had happened. We had installed on of the tiles purchased on Friday night - which were the correct ones. The other 21 we had laid were the wrong color - barely but still wrong. So we pulled them up, washed them off, returned them and started all over again. Andy is VERY patient with me.
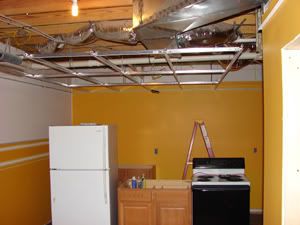 Here you see our initial progress with the suspended ceiling. This is simply an adult-size erector set. However, you have to get it EXACTLY right from the start or you will never get it right. We started with a four-foot level and realized we would not be exact enough. After much head-scratching and phone calls, Todd Ellis agreed to let us use his rotating DeWalt laser. That incredible device made things go much quicker and even fun. It gets a little complicated working around the heating ducts but so far, so good.
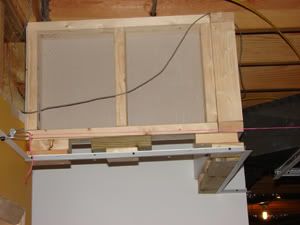 I earlier mentioned the problem with the suspended ceiling and our stairwell ceiling. It was too high for the rest of the suspended ceiling - thanks to the waste pipe. We had to lower the stairwell ceiling and it runed out to need exactly three inches, which is also exactly the width of two 2x4s. It might not look good here (we know it doesn't look good so be quiet), but once some decorative wood trim is nailed up, no one will ever know (except the three or four guys who read this long blog).
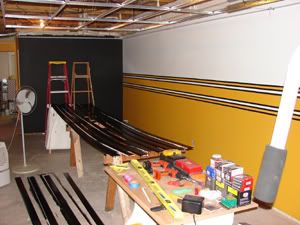 Well, it is now late on a Tuesday night, July 25. I've spent the night painting and you can see the handiwork. Well, you can't see the third coat in the bathroom and stairwell but it is boring plain white. Here, you can see the final version of the stripes. The black stripes are a little wider than I wanted them to be but I could only find painters tape in 3/4" width. If I didn't use that, I could have accomplished the correct perspective of stripe widths but it would have also taken multiple more steps of tape-n-paint and I just couldn't bring myself to do it on this long 42-foot wall. You can also see the glossy black baseboards that will be nailed up soon. The carpet comes Monday and the black leather furniture comes Tuesday. After that, all that remains is to put up the closet doors on the HVAC closet, cut the countertop to size for the kitchen and cut the hole for the sink and then get the plumber and electrician over to complete their expert work. I'll post pictures of the completed project once it's done sometime in late August.


3 comments:
Looks good, Jeff. I pulled for the Steelers against Dallas in the 70s' Superbowls (mainly because my brother pulled for Dallas).
Arguably, painting the Steeler stripes was more difficult than mudding the drywall. We mudded the drywall in the kitchen last year and the front room this year. It's no trouble except for the time it takes for the layered applications. Three days is about right.
Andy sounds like one of those friends who would help you hide a body.
Jeff,
I could probably paint that Logo for you. It's simple enough. All I'd need is the red, yellow and blue for the stars with white and black to mix shades.
Lois suggests you put a mat on the step to keep the boys from slipping. You could maybe find one you could cut to size and lay the rest on the floor where the cutout would snug up to the bottom of the step. The edge of the mat would help protect from the sharp edges of the tile.
Post a Comment